Wow... that's all I can say. Wow. Has it really been over a year since my last post?? I feel so guilty that I haven't updated this blog in so long! I do, after all, love it! So, whilst my apologies might fall on deaf ears, let me take time to say (I would scream at the top of my lungs, but I am in the library...) "I'm SORRY!!" I had plans to update! I really did! However, life tends to get in the way of our plans. So... if I promise to update soon, will you promise not to desert me?? I really will this time!
Look for me soon. I'll be back!
-T.L.C.
P.S. How cool is it that my initials are TLC now?!
P.S.S. I promise that I won't go chasing any waterfalls.

Wednesday, August 7, 2013
Wednesday, July 18, 2012
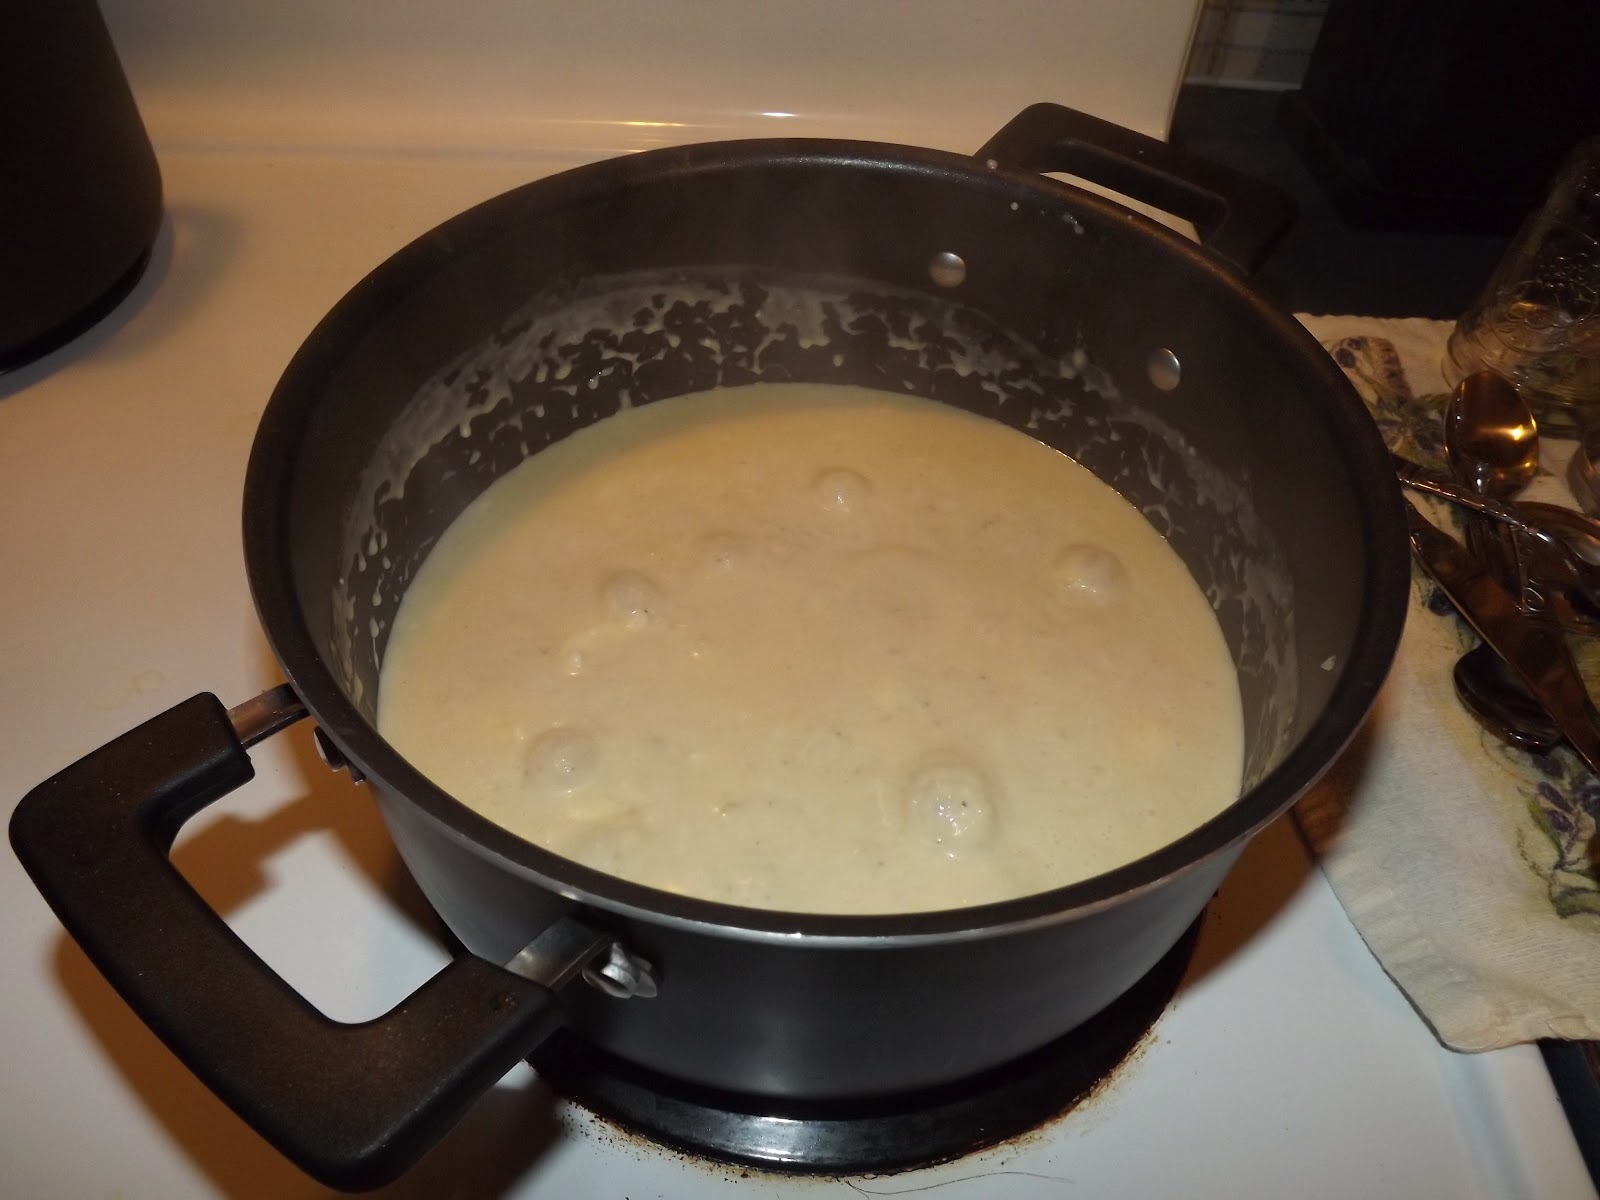
Cheesy Potato Soup
I know what you're thinking. "You mean she's not dead!? Or lost?! Or living in the middle of the woods with only nature for company?!" The answer to all of those questions is NO! I am still alive and kicking, and back with a new recipe for you. Before we get started, though, let me at least offer an excuse or two as to why I've been M.I.A. for a few months. Firstly, I got a new job! Yay! And may I just say, I LOVE IT. Seriously, I couldn't be happier in another job. Because of that, however, my free time has been drastically reduced, and I haven't been around to update. I know, though, that's not much of an excuse. Secondly, and more than likely the real excuse for my absence is that my father passed away very suddenly. Actually, I began writing this post the day that he died, and just didn't have the heart to pick it back up right away. Yes, I know it is terribly sad, and I do miss him, but I'm back, and ready to share some more yummy and crafty things with you guys!


5. Add the seasoning salt, and pepper, and stir well.
6. Serve, and garnish with green onion, bacon, and cheese, if you'd like.
7. ENJOY!
Seriously, this is SOOOO good! I hope you enjoy it just as much as the husband and I do, though I hope you don't have to use it for comfort food through a cold like I did. Happy cooking!

I love comfort food. I especially love comfort food whenever I'm sick, or feeling down. Not too long ago, I came down with a terrible cold. I felt as though my entire head was about to explode because of the congestion, and I had this fantastic fever that made me feel hot and cold all at the same time. Yeah, I love being sick. During this time, I didn't really feel like doing anything but stretching out on my couch under a blanket, but since the husband was working, I had to eat at some point. Usually when I'm sick, my Mom makes me potato soup. It is comfort food to me, and I love hers. During this lovely period of sickness, however, my mom was thirty minutes away, and I certainly wasn't going to ask her to drive all the way to my house simply to make some potato soup for me. So, I took to the kitchen, blanket still wrapped around my shoulders, and this is what I came up with.

And may I just say? Its good. Very good. It creamy, and cheesy, and just tasty all around. I've been told that it tastes quite a bit like the potato soup from Panera Bread, but since I've never had it, I couldn't tell you. Regardless, its very good. Comfort food at its finest. I swear, I felt better as soon as I had a bowl. I hope that you enjoy it just as much as I did, and continue to do. In fact, we're having this for dinner tonight!
Cheesy Potato Soup
You need:
4 cups of potatoes, peeled, rinsed, and cubed
1 8 oz. block of cream cheese, cubed
4 cups of water
4 chicken flavored bouillon cubes
1 Tbsp of seasoning salt
1 teaspoon of pepper
Shredded cheese (optional)
Bacon (optional)
Green onion (optional)
Directions:
1. Put 4 cups of water and chicken flavored bouillon cubes in a pot, and heat until boiling.

2. Add 4 cups of peeled, rinsed, and cubed potatoes, and boil until soft.

3. Using the back of a ladle, or a potato masher, mash the potatoes to the desired consistency. I like my potato soup with hardly any big pieces of potato, but mom likes hers with chunks of potato. To each his or her own, I suppose. Mashing the potatoes will release starch, also, which will thicken the soup.

4. Add the cubes of cream cheese, and stir until melted.
5. Add the seasoning salt, and pepper, and stir well.
6. Serve, and garnish with green onion, bacon, and cheese, if you'd like.
7. ENJOY!
Seriously, this is SOOOO good! I hope you enjoy it just as much as the husband and I do, though I hope you don't have to use it for comfort food through a cold like I did. Happy cooking!
Wednesday, March 21, 2012
"Hunger Games" Book Page Necklace
Hello, all! If you know me at all, you know just how much I enjoy books. After all, I do have a degree in Library Media, so really it comes with the territory. I read as often as I can, and as such I've picked up many many MANY books over the course of my life, several of which have become favorites. Have you read The Hunger Games trilogy yet? If not, YOU NEED TO! I love these books, and I've been really excited for the movie ever since I heard they were actually making one. In my little circle of friends, we enjoy nothing more than getting all hyped up for a midnight movie premiere, then dressing our best and attending with other fans. That being said, I've had my tickets for the midnight premiere of The Hunger Games for over a month now, and the day is nearly here! I knew that I wanted to deck out in Hunger Games gear when I attended the premiere, so the gears in my head started spinning, and I remembered some picture frame pendants that I picked up at Hobby Lobby several weeks ago, fully intending to make a necklace for my Grandmother with pictures of us Grandkids inside. Needless to say, when I started plotting to make some Hunger Games jewelry for the premiere, that necklace never got made. Instead, I used that picture frame pendant to make the necklace I'm featuring below. Its OK, though. I'll pick up another pendant the next time that I'm in Hobby Lobby, and get that to her by Mother's Day! I fully intended on posting this earlier in the week so that others could make their own Hunger Games necklace for the premiere, but alas, I am still a procrastinator, even though I've been out of college for a semester now.

Hunger Games Book Page Necklace
You Need:
1. Prepare your pendant by taking the glass out, and making sure that it is clean. You wouldn't want to assemble your pendant, only to find out that the other side of the glass or plastic is dirty. Here is the type of pendant that I used for this project, along with my other supplies.


Hunger Games Book Page Necklace
You Need:
- A picture frame pendant
- A chain to put your finished pendant on
- Additional charms for your necklace (I added an arrowhead charm for Katniss!)
- You may need jump rings to attach your pendant to your chain, or charms to your necklace
- Jewelry pliers are always handy for attaching jump rings
- Old book pages ( I know it seems like sacrilige to cut up a book. I suppose that you could copy the passage you'd like to use, but only if you feel comfortable breaking copyright laws. Thankfully, I have two copies of Mockingjay, one of which has severe water damage throughout. One must be careful while reading books on a raft in the swimming pool. I have learned this.
1. Prepare your pendant by taking the glass out, and making sure that it is clean. You wouldn't want to assemble your pendant, only to find out that the other side of the glass or plastic is dirty. Here is the type of pendant that I used for this project, along with my other supplies.

2. Cut the book page you've picked out to fit your frame. My frame is clear on both sides, so I had to to cut two squares for mine. You may only have to cut out one, it just depends on your frame. Make sure to trim the edges so that your paper doesn't wrinkle when you put it in the frame. After inserting your quote, close up your pendant.

3. Attach any charms or beads onto your pendant. I chose an arrowhead (I wanted a whole arrow, but couldn't find one), since it represents Katniss so well.


4. Its time to attach your pendant to your necklace. I used a jump ring to attach mine, but you may be able to simply slide yours onto your chain. Like I said earlier, this all depends on the kind of pendant that you purchased.

Now you can wear around your awesome Hunger Games necklace, and when other fans ask you where you got it, you can proudly tell them that you made it yourself! Hopefully, you'll have time to make your own before the premiere of the movie! May the odds be ever in your favor!
Wednesday, March 7, 2012
Crock Pot Chicken and Dumplings
Hello, all! We've been experiencing some weird weather as of late in my beautiful home-state. One day, its raining. The next, its snowing. Two days later, it may be sunny with a high of °75. Just a few days ago, tornadoes ripped through several counties in this great state, and left towns destroyed and families displaced from their homes. I encourage all of you to give all that you can to disaster relief efforts that will benefit these families. I know that there are several drop off locations in Letcher County that are collecting non-perishable food items, cleaning supplies, baby items, blankets, and other supplies. I know that all supplies, support, and prayers are welcome.
As I'm typing this, I hear birds singing outside of my front door. It is warm, sunny, and beautiful in this little hollow that I live in. A few days ago, this is what I saw outside of my front door.


3. Cover, and cook on low for 5 to 6 hours.


As I'm typing this, I hear birds singing outside of my front door. It is warm, sunny, and beautiful in this little hollow that I live in. A few days ago, this is what I saw outside of my front door.

Believe it or not, there IS a road there. This was only an hour or so after the snow started coming down. Needless to say, Josh and I didn't leave Doty Creek for a few days. Winter weather always makes me want to curl up on the couch with a good book, and something warm and yummy to eat. During this particular winter storm, I decided that I didn't want chili, or any other kind of soup, but I wanted something low maintenance that I could stick in a crock pot, and cook all day long. So, I broke out the trusty First Baptist Church Cookbook, and started browsing.
I LOVE my First Baptist Church Cookbook. I basically learned to cook using the recipes of the men and women that helped build my church. If you know me at all, you know that I have been a member of First Baptist since I was born in 1987. I grew up in my church, and love my church family like my real family. That is why this cookbook is so special to me. Its like a little part of my Church history, and so its like a little part of my history.

After I started flipping through the cook book (which has a whole section dedicated entirely to slow cookers), I found a recipe for crock pot chicken and dumplings. It sounded so good, that I just had to try it. It certainly didn't disappoint. The best part is that I got to throw everything into the crock pot, and let it do all of the hard work for me. I even had time to go outside and roll around in the snow with my Siberian Husky!

She looooooves snow! She was so excited that she couldn't stand still! This was the only picture that she would stand still for! After rolling around in the snow with Nami, I came back in and got warm with a nice bowl of chicken and dumplings, then curled up with a good book. After finishing off a second bowl for lunch the next day, I knew that I had to share this recipe with you!
Crock Pot Chicken and Dumplings
Slightly modified from the recipe of Mrs. Peyton Reynolds
You need:
4 chicken breasts (the recipe calls for boneless, but I just used the split breasts that I had in the freezer)
2 cans of condensed cream of chicken soup
2 cups of water
1/3 cup of onion, finely chopped
1 chicken bouillon cube
2 (10 oz.) cans of refrigerated biscuits
Directions:
1. Cut the chicken breasts into small chunks. Since I used split breasts, I boiled them for about 20 minutes with some butter, then pulled the chicken from the bone in chunks after cooling.

2. Combine all ingredients, except for biscuits, in the crock pot.

3. Cover, and cook on low for 5 to 6 hours.
4. Tear biscuit dough into 3-4 pieces, and gently stir into the crock pot.

5. Cook an additional 40-45 minutes, or until dumplings are cooked through.
6. ENJOY!

I hope that you love this recipe as much as I do! When I asked Josh if he liked it, all he could do was give me thumbs up, because he was too busy eating! Happy cooking!
Saturday, February 25, 2012
Personalized Dinner Plates
Hello, all! Recently, I've been shopping around online, looking for some things that are monogrammed with a 'C' on them. I've only been married for three months, so I'm still slightly obsessed with my new last name. Actually, I've yet to legally change my name, but I'm going to! And then, I'll be slightly obsessed with it some more! I had been looking for some dishes for everyday use in our house as of late. I have a very nice set of Fiesta plates, bowls, and mugs, but I don't want to us them so much when its just Josh and I eating dinner. We're both a little accident prone, and I'd like to keep nice dinnerware for later use. I wanted some cute dishes that wouldn't be expensive, and would coordinate well with my Fiesta stuff, which happens to be quite bright.


Anyway, I did a little researching, and found these plates on http://www.zazzle.com/.


Anyway, I did a little researching, and found these plates on http://www.zazzle.com/.

I really liked the idea of monogrammed plates, but I didn't really like diamond design. I really didn't like the $29.95 price per plate, either. We're on a budget in this household! I wanted at least four plates, and I could definitely use the $120 that they would cost for something much more worthwhile. So, my crafty brain started scheming, and I said, "I bet that I could monogram some plates myself!" So, I broke out the etching cream and paint brush, and this is what I came up with!


Please excuse the pictures. And the incredible mess on my kitchen table. It was board game night when I etched this plate, so there are pizza boxes and, well, board games everywhere. Anyway, I love my new plates! They're so cute, and I only paid $1.50 a piece for them, since I already had the etching cream. You can do this too! It was super easy, and ended up being just what I wanted. Without further ado, here is a tutorial!
Personalized Dinner Plates
You need:
Rubber gloves
Glass plates (or anything glass that you'd like to etch)
A paint brush
A stencil of what you'd like to etch (It needs to be sticky on one side. Vinyl, or contact paper works well)
Etching cream
Craft knife (Exacto knives work the best for this)
Directions:
1. The very first thing you need to do is remove all stickers from the back of your plates. Make sure that they are clean, and dry.
2. Time to cut out your pattern! I used my cricut to cut out my stencil for me. It worked out well for me, because a 'C' doesn't need to be flipped like other letters do. Keep in mind that you will be etching on the bottom of your plate. You don't want your letter to be backwards after etching. If your letter needs to be flipped, or if you don't have a machine to cut your stencil out for you, first print off your letter, making sure to reverse it before printing. Then, place your printed letter on top of the vinyl or contact paper (on the paper-backed side). Using the exacto knife, cut out your stencil.

3. Transfer your stencil to the back of your plate. You can either do this by hand, which can be a little difficult, or with the aid of transfer tape, or another piece of contact paper. I usually just use the contact paper, since transfer tape is rather expensive. Simply peel and stick a piece of contact paper over the non-sticky side of the stencil, then peel the backing of the stencil, and transfer it to your plate. Make sure that you push down all of the edges very well. You don't want etching cream to leak under the stencil, and etch places you didn't want etched!
 |
| I used clear contact paper to transfer my stencil to the plate. You can barely see it in this picture. |
 |
Here, I placed the stencil onto the plate, then carefully peeled away the contact paper.
|
 |
| Here is what the stencil looks like from the other side of the plate. |
4. Its time to put on your rubber gloves! Seriously, do NOT touch etching cream with your bare hands. I use Armour etch, which can be found in lots of craft stores, including Hobby Lobby, which is where I got mine. Etching cream can be a little expensive. The bottle that I got was about $7, but after I get done using it, I just scrape the excess back into the bottle and use it again. I've etched a bowl, a jar, and four plates, and I've still got at least two-thirds of a bottle left. Here's a picture, so you know what to look for!

5. Apply a generous amount of etching cream over your stencil. When I say generous, I mean it. The first time I tried to etch something, I didn't use enough etching cream. Needless to say, I threw that cookie jar away.

6. The directions on the etching cream bottle say to leave the cream on for five minutes or so. I always leave mine on for ten, just to be sure that all areas etch evenly. After your ten minutes are up, scrape the excess cream back into the bottle, and rinse of the remaining. Make sure to read all of the directions on the back of the etching cream bottle, because etching cream can harm some types of material, and you don't want to mess up your sink!). After rinsing, peel off your stencil, and wash your plate off. There you are! Some pretty, monogrammed dishes for much less than $29.95 per plate!

Seriously, the pictures do NOT do them justice! They're adorable! If you come and eat dinner at my house, most likely you'll be served a meal on one of these plates, simply because I love them so much and want to show them off. I hope that you get to make some cute monogrammed dishes too! Hopefully I'll be back later this week with some more crafty things for you to try! Until then, happy crafting!
Wednesday, February 15, 2012
Taco Casserole
Happy belated Valentine's day, all! Hope that you Valentine's Day was as good as mine! I got to spend the day with Josh, which is always wonderful. This was our first Valentine's Day as a married couple, but our ninth since the two of us got together. I decided to cook dinner for the two of us, and we knew right away that we wanted something Mexican-ish. I'm sick of tacos, and so is Josh. I love a good taco and all, but I can only eat them so many times. So, I brought out the faithful First Baptist Church Cookbook, and started browsing. This was the recipe that I came across, and decided to try. We both loved it, and it will definitely be making another appearance at our dinner table. Its a very yummy alternative to tacos when you're craving some yummy Mexican food.
 Taco Casserole
You need:
1 lb of ground beef
1 envelope of taco seasoning
1/2 cup of onions
1 can (16 oz.) of refried beans
1/2 of a 12 oz. jar of picante hot sauce
1 can (8 oz.) of tomato sauce
1-2 cans of crescent rolls
1/3 cup of corn meal
1 bag of cheese (I used mexican blend, but any type of cheddar would probably be good)
lettuce
tomatoes
green onions
sour cream
Directions:
1. Preheat the over to 375 degrees.
2. Brown the hamburger meat and onions together. Drain.
3. Add taco seasoning (do not add water), refried beans, tomato sauce, and picante sauce. Mix well.

4. Use the crescent rolls to make a crust on the bottom of a 9 x 13 pan. I only used one can, but feel free to use two if you like a thicker crust.

5. Coat the crust in oil, then sprinkle the cornmeal on top of it.

6. Spread the meat mixture on top of the crust.

7. Bake at 375 for 25-30 minutes. After baking, remove from oven, and cover with grated cheese. Return to the oven until cheese is fully melted.

8. After cheese is melted, remove from oven. Cover with taco toppings like lettuce, green onions, tomatoes, and sour cream. Enjoy (You can clearly see that Josh enjoyed it; some of it was missing before I could get my camera to take a picture)!

Hope you enjoy! I think we'll be seeing a lot of taco casserole in this house. I'll be back later this week with some more great stuff for you to try! Until then, happy baking!
Saturday, February 4, 2012
Easy Slow-Cooker Chili
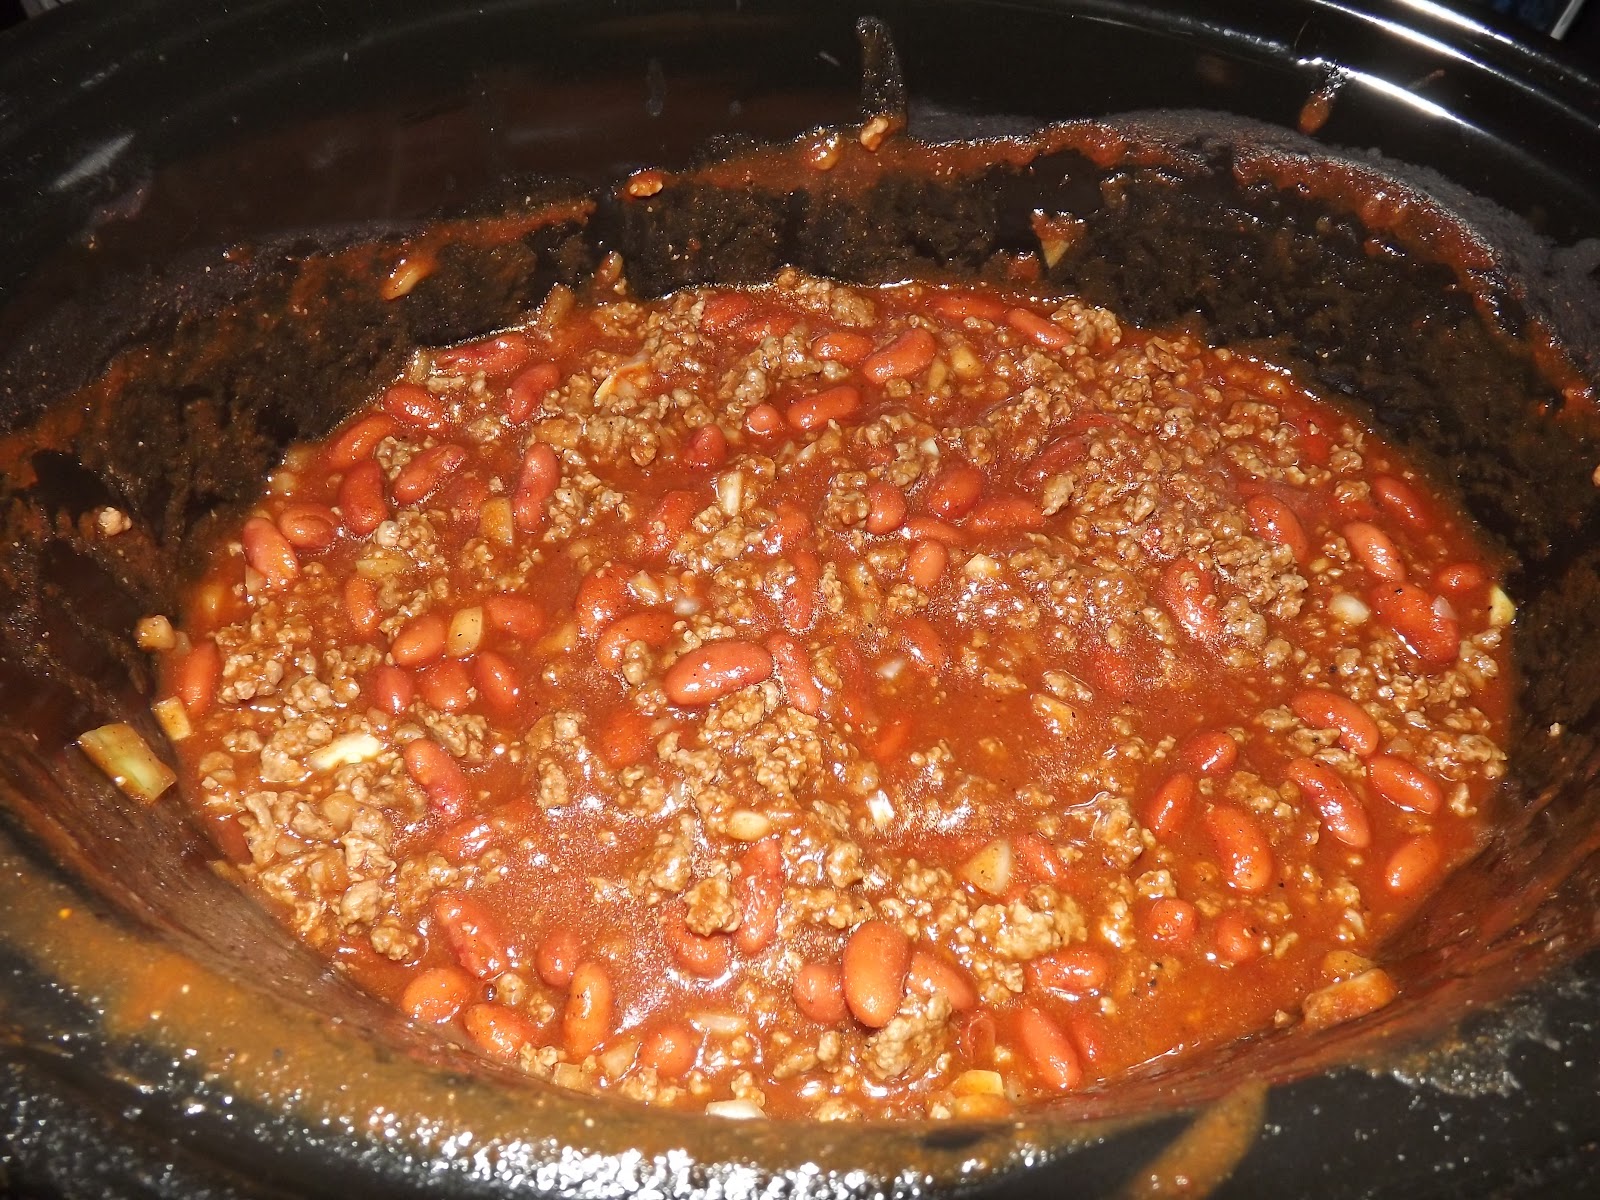
Every year since I was in middle school, I have spent Super Bowl Sunday at the home of a church-family member, and often we ate chili while we watched the game (or mostly the commercials, in my case). Because of that, my mind equates the Super Bowl with chili. Since Super Bowl Sunday is upon us, I figured I would share my favorite chili recipe with you guys. If you haven't decided what to make for your own Super Bowl party, this chili would be perfect! Its so yummy!
 Easy Slow-Cooker Chili


You need:
2 (16 oz.) cans of red kidney beans
3 (8 oz.) cans of tomato sauce (I usually just use two larger cans of tomato sauce, because I like soupy chili)
2 lb. of ground beef, browned and drained
2 teaspoons of garlic salt
2-3 Tablespoons of chili powder
1 teaspoon of pepper
1 teaspoon of cumin
1/2 of a yellow onion
A slow cooker (mine is a 7 qt., but the recipe could be altered to fit any size)

Directions:
1. Open and drain the kidney beans. Add them to the crock pot.
2. Add the tomato sauce to the crock pot.

3. Brown hamburger meat and chopped onion. Drain, and add to the crock pot.

4. Add the garlic salt, pepper, chili powder, and cumin. Stir well.
5. Cook on high heat for 3-5 hours, covered, stirring well every now and then.
6. Enjoy with some shredded cheese and sour cream! Go on, you know you want to!
I love this chili. We keep the leftovers in the fridge for a few days, and then freeze it. It tastes just as good! We're thinking about trying this same recipe with chicken, or ground turkey. If we do, I'll be sure to post the results! Tomorrow, I'm going to try my hand at furniture-making. We'll see how that goes. It could be a disaster. If everything turns out well, I'll have a new coffee table, and you guys will have a new tutorial. We'll see! Until then, happy cooking!
Subscribe to:
Posts (Atom)